SIG Talk banner

Installed mag catch stop on P229 wrong

19K views 37 replies 19 participants last post by  Ratwater1958  
#1 ·
Hello. I'm new to the forum and recently ordered a nickel mag catch from the factory to install in my P229. Suffice it to say I made a mistake and put the detention in backwards. Is there a home fix for this? Any advice and instructions would be appreciated!
 
#2 ·
I've never done this but read here on ST that a member used a blade type feeler gauge (0.005"?) and maneuvered it between the mag catch and the frame to depress the mag catch stop. Can't remember if he came in from the right side of the frame (grip panel removed) or up thru the mag well. He was able to depress the mag catch stop enough to remove the mag catch assembly from the frame.
 
#3 ·
This happens often enough that Sig has a jig set-up at the service shop to drill out the release when you send it to them. Before someone starts with the poor design comments, this is not a part that is serviceable and you are on your own if you remove this part and reassemble incorrectly. As ThnkFrst stated, I have also read that you can use a feeler gauge while also using a pick to push or slide the magazine catch stop into the magazine catch. Rollo1880 don't feel embarrassed, you're not the first, won't be the last, it even occurred during my armorer's course. All the frames that were being used during the course I took were really beat up, I know I could see nicks and gouges in the aluminum frame of the one I was using in the magazine catch hole. Secure the frame in a padded vice and choose the right tools as suggested, and use the Force (patience) you'll get it.
 
#4 · (Edited)
from sigforum:
Get you a set of feeler gages. .004 works best but .005 will work. Trim it like the picture where the end will be about 1/8" to 1/4". Depress the mag release into the frame. Slide the feeler gage down between the release and the frame as far as you can make it go. Push up on the release and be sure to catch the stop and spring. It may take once or twice.
 

Attachments

#11 ·
It should, but would suggest doing it sober, so you don't do anything you will regret, not thinking straight.
 
  • Like
Reactions: incar
#15 ·
Autozone should have them, or any decent auto parts store.
 
#17 ·
Should be able to use tin snips, as these aren't thick or "hardened"...
 
#21 · (Edited by Moderator)
I tried to edit the pics to show correctly but I'm doing this on an Android phone. If a moderator could please fix the pics I would greatly appreciate it.
My Sig P226 is an early mix-master that has been magnaported and has a stainless buffer and locking block. It is an extremely fast and accurate shooter.

Image


Image


Image


Image
 

Attachments

#25 · (Edited)
Mega Culpa...Put one in upside down on my first Mag Release change yesterday. Fortunately I remembered this technique, and I had a super thin copper washer I cut down for the job. It wasn’t perfect, and I did chip off a tiny piece of the top edge, but plenty left to retain the stop. I dremeled out a tiny pocket to improve the hole. Spraying high temp grill paint to cover the divot.

I’m going to Amazon to order a feeler gauge in case it happens again.

Image

Image
 
#26 · (Edited)
Update #2 Found a Dremel Tool that carved a nice little shelf in the Magazine Release hole, then darkened the dremeled out aluminum with Casey’s Aluminum Black touchup. Now I have a Frame ($275) coming I don’t need. But I found a complete P239 40 S&W Upper for it. So for 275+290=$565 (plus another $60 for an SRT Kit) I have a new P239. I have enough barrels that it can be 357, 40, or 9mm.

Update...Found a new complete Black 40S&W Frame on GB, so I will be swapping it out. I’m not comfortable with the magazine release hole I damaged. Maybe I’ll flip it to a Left Hand Release and sell it like that.
 
#33 ·
Sorry for the delayed follow-up....

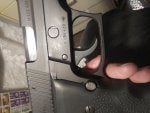
I cut the blade long, but the cut/reduced-width section need be only 1/4-3/8". Obviously, if long, one need to choke-up on the hold, near the end, as the .004" isn't particularly stiff.

I cut it to 1/4" wide, and rounded the end/tip to facilitate insertion/engagement...

I don't recall whether or not I had the retainer plate/tension spring installed on the opposite end; though, that would put unwanted tension on the detent pin, working against the process. One would, of course, need to apply a little push, once the gauge blade has effected the release, to get the catch to move out...

-------------

*** I don't have a current photo-hosting option, so....if someone who does, would receive a few photos via e-mail/PM/Conversation, and add them, it would be appreciated and answer Stiker269's request, thanks.

----------


In response to ThnkFrst/post #31 - All seems correct; gunsmith says should round-in with some use. Also, I had gone right ahead and ordered all associated parts from SIG, so have the option to just replace everything...
 
#34 ·
I don't have a "hosting site" either, I just upload the .jpg file as an attachment "thumbnail" using "Go Advanced", so if people just click on it, it will expand.
 

Attachments

#35 ·
I too ran into this issue because the button rotated during assembly.

I used a 0.003 gauge and thinned it to 1/4 inch, followed the directions and it popped right out without any problem. I used a slightly different design but it worked just as well. I narrowed the gauge till the center was 1/4 inch and each narrow side was 1 inch long, depressed the release as far in as it would go then wiggled the gauge in a few times and pushed the mag release button towards the Shim and it walked right out as if the tool was purpose-designed for the job.

Then to avoid button orientation problems, I used the gauge to orient the lip of the button towards the center of the frame, pushed the button in, and when I pulled the shim the button deployed perfectly and the orientation was assured.
 
#36 ·
I too ran into this issue because the button rotated during assembly.

I used a 0.003 gauge and thinned it to 1/4 inch, followed the directions and it popped right out without any problem. I used a slightly different design but it worked just as well. I narrowed the gauge till the center was 1/4 inch and each narrow side was 1 inch long, depressed the release as far in as it would go then wiggled the gauge in a few times and pushed the mag release button towards the Shim and it walked right out as if the tool was purpose-designed for the job.

Then to avoid button orientation problems, I used the gauge to orient the lip of the button towards the center of the frame, pushed the button in, and when I pulled the shim the button deployed perfectly and the orientation was assured.
I made the same mistake but did not have a feeler gauge around, used a model knife instead. Did it on my second attempt.