

Installed Lightning Strike's stainless steel striker today. No tools were necessary, a fingernail can press the slide's back cover's release button. Also, I used paper pads to hold the striker up to re-assemble the 2 piece spring clips.
Mr caliper had a look at both - There were only a couple very small, <0.5mm differences at the shoe ends. SIG's striker's shoe is slightly thinner at the toe, and wider at the ankle.
Their overall lengths are the same. Also, their firing pin extension's length & diameter are the same. In another ST thread Mr corey5188 showed SIG's MIM striker is 0.69g lighter than LSI's steel version. So, LSI's steel is less than 10% heavier - IMO that's not an issue...
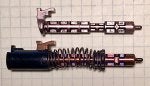
Here's 365's striker assembly over LSI's steel striker. Notice the striker's main spring is held in place with a 2 piece ploy spring clip that's located around a collar detent or neck machined into the striker. Removing & assembling this spring clip is the crux of this task.
![Image]()
Disassemble is quick and easy - pull the spring back and it almost falls apart! Simply place the striker pointing up with the shoe end on a solid surface. Then pull the main spring down to release the spring from this 2 piece clip. You may need to use a fingernail to slide the spring off the clip.
*** CAUTION *** Keep a sure grip on the striker & spring to avoid parts flying away - You're gonna need all these tiny parts for re-assembly! FYI, some folks do these spring loaded tasks inside a large freezer bag...
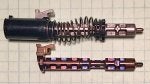
Here are the striker parts disassembled.
![Image]()
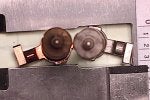
Here's SIG's striker over LSI's. In this pic, the strikers' shoes are upside down on the left with the firing pin extension on the right.
![Image]()
Sorry this pic didn't properly focus, but SIG's striker isn't as round as LSI's. Don't think that's an issue, but it is a difference...
![Image]()
Re-assembly is a little more tedious. First slide the small assist spring from the firing pin end up to the shoe. Next from the pin end, slide the black ploy collar with its slotted end first & then the main spring. Easy Peasy!!
Now's the crux - I used a couple paper pads to hold the striker up while I compress the spring and insert the 2 piece poly spring clips. Again, be careful with a secure grip and do NOT have your face over & looking down on this assembly as you're working - You'll shoot your eye out!!
![Image]()
Without taking pics, this is a 10 or 15 minute deal, so take your time. Or have a good smith do it for ya .. If he likes ya - Shouldn't cost more than $30 bucks...
![Image]()
Think am ready for some range FUN!!
Cheers
Mr caliper had a look at both - There were only a couple very small, <0.5mm differences at the shoe ends. SIG's striker's shoe is slightly thinner at the toe, and wider at the ankle.
Their overall lengths are the same. Also, their firing pin extension's length & diameter are the same. In another ST thread Mr corey5188 showed SIG's MIM striker is 0.69g lighter than LSI's steel version. So, LSI's steel is less than 10% heavier - IMO that's not an issue...
Here's 365's striker assembly over LSI's steel striker. Notice the striker's main spring is held in place with a 2 piece ploy spring clip that's located around a collar detent or neck machined into the striker. Removing & assembling this spring clip is the crux of this task.
Disassemble is quick and easy - pull the spring back and it almost falls apart! Simply place the striker pointing up with the shoe end on a solid surface. Then pull the main spring down to release the spring from this 2 piece clip. You may need to use a fingernail to slide the spring off the clip.
*** CAUTION *** Keep a sure grip on the striker & spring to avoid parts flying away - You're gonna need all these tiny parts for re-assembly! FYI, some folks do these spring loaded tasks inside a large freezer bag...
Here are the striker parts disassembled.
Here's SIG's striker over LSI's. In this pic, the strikers' shoes are upside down on the left with the firing pin extension on the right.
Sorry this pic didn't properly focus, but SIG's striker isn't as round as LSI's. Don't think that's an issue, but it is a difference...
Re-assembly is a little more tedious. First slide the small assist spring from the firing pin end up to the shoe. Next from the pin end, slide the black ploy collar with its slotted end first & then the main spring. Easy Peasy!!
Now's the crux - I used a couple paper pads to hold the striker up while I compress the spring and insert the 2 piece poly spring clips. Again, be careful with a secure grip and do NOT have your face over & looking down on this assembly as you're working - You'll shoot your eye out!!
Without taking pics, this is a 10 or 15 minute deal, so take your time. Or have a good smith do it for ya .. If he likes ya - Shouldn't cost more than $30 bucks...
Think am ready for some range FUN!!
Cheers


") .
.

